
By default, Spinnaker does not have CentOS baking option. In this technical blog, we will be demonstrating how to bake a CentOS image and deploy an instance using the baked image on AWS cloud.
Scope
This procedure is performed under the following environment,
– Spinnaker 17.4.0 (However the same can work on new versions of Spinnaker)
– Cloud provider is AWS
Pre-Requirements
To enable CentOS image baking option in Spinnaker, we assume that following requirements and configurations are already met:
– You have a valid Access and Secret keys to connect with your AWS account
– In Spinnaker, an AWS Account is added & enabled for EC2 deployment
– A Spinnaker application is created with AWS cloud-provider enabled
If you have a Managed Account created, then following commands can enable AWS account on your Spinnaker
Note: Throughout this document, you will find references to AWS Accesskey and Secretkey. You must replace them with your Accesskey and Secretkey. You will also find an S3 bucket name and it should be replaced with your storage bucket value.
How to do?
Procedure Outline
1. Setup AWS Cloud provider account
– Enable AWS CloudProvider account
2. Publish RPMs
– Build Code and generate deploy-able RPM package
– Setup Yum repository on a Build machine
– Setup Yum repository on S3 bucket
3. Configure Bake Stage & Deploy Stage
4. Pipeline execution and verification
Detailed Procedure
1. Setup AWS Cloud provider account
Please refer to the blog ‘Setting up AWS as a cloud provider account‘ to configure your AWS cloud provider account.
2. Publish RPMs
Build Code and generate deploy-able RPM package:
You can generate your app’s RPM package by any of your methods like a step in Gradle/Maven build or by a Shell post-build script process.
3. Setup Yum repository on a Build machine
a. Yum repo is a directory structure with some special files like repomd.xml.
NOTE: Technically every time there is rpm file update on the target Yum repository, we need to update the repomd.xml and other metadata files within the repo. Therefore, we use a program called createrepo on the Build, machine to update the said files and then sync the repo content with remote S3 bucket repo which is the actual Yum repo source for package deployments.
The directory structure looks like the below
					 ${YUMREPO_PATH}/
    |--app1.rpm(Symlink to app1.rpm under Packages directory)
    |--Packages/
      |--app1.rpm
      |--app2.rpm
    |--drpms/
    |--repodata/
      |--repomd.xml
      |--<more auto-generated files>
Assuming that our YUM repo ($YUMREPO_PATH) resides here – /repos/OpsMx-yum, create the mandatory directories with the command
`mkdir -p ${YUMREPO_PATH}/Packages`
b. Copy the rpm files from your application directory to the ${YUM_REPO}/Packages`
cp -v $APP/build/distributions/*.rpm $YUMREPO_PATH/Packages/`
c. Create the rpm metadata files so that the repo becomes yum-repostiroy.
`createrepo $YUMREPO_PATH -v --update --deltas "$arch" > /dev/null`
For every subsequent rpm files update, you can update the repo as
`createrepo $YUMREPO_PATH -v --update --deltas "$arch"`);
4. Setup Yum repository on S3 bucket
- Create an S3 bucket in your AWS account
- Make the bucket publically accessible
- On the Build machine, run the below command to sync the repo content to S3 bucket
aws s3 sync --delete --only-show-errors "$YUMREPO_PATH"/ s3://"$S3_BUCKET"/
Note: The procedure in step 3 and 4 are given in the script snippet below
					#!/bin/bash
YUMREPO_PATH="/repos/saga-yum"
YUMREPO_CACHE="/repos/saga-yum_cache"
S3_BUCKET="$AWS_BUCKET"
echo "Copying RPM files to the Local Yum repo."
mkdir -p $YUMREPO_PATH/Packages
cp -v build/distributions/*.rpm  $YUMREPO_PATH/Packages/
cd $YUMREPO_PATH
rm -f *.rpmfor f in Packages/*.rpm; do
   #echo $f
   fn=`basename $f`
   echo $fn
   ln -s $f  $fn
done
createrepo -c "$YUMREPO_CACHE"  -v --update --deltas "$arch" > /dev/null
echo "Sync S3 bucket"
#http://ops-rpm-bucket.s3-website-us-east-1.amazonaws.com
aws s3 sync --delete --only-show-errors "$YUMREPO_PATH"/ s3://"$S3_BUCKET"/
5. Configure Bake Stage & Deploy Stage
a. Create/update the file ~/.hal/default/profiles/rosco-local.yml with the content below. This is the S3 bucket where we published our RPMs, you would need to replace it with your bucket.
yumRepository: http://ops-rpm-bucket.s3-website-us-east-1.amazonaws.com
b. Create/update the file ~/.hal/default/profiles/rosco.yml with the content below. NOTE: You would have the update and trim the images list. Also, modify the AWS_ACCESS_KEY and AWS_SECRET_KEY values to your spec.
					spectator:
      applicationName: ${spring.application.name}
      webEndpoint:
        enabled: false
    aws:
      enabled: true
      bakeryDefaults:
        baseImages:
        - baseImage:
            id: centos           shortDescription: v7.1708
            detailedDescription: CentOS Linux 7 x86_64 HVM EBS 1708_11.01
            packageType: rpm
            templateFile: aws-ebs.json
          virtualizationSettings:
          - region: us-east-1
            virtualizationType: hvm
            instanceType: t2.micro
            sourceAmi: ami-02e98f78
            sshUserName: centos
            spotPrice: 0
            spotPriceAutoProduct: Linux/UNIX (Amazon VPC)
          - region: us-east-2
            virtualizationType: hvm
            instanceType: t2.micro
            sourceAmi: ami-e0eac385
            sshUserName: centos
            spotPrice: 0
            spotPriceAutoProduct: Linux/UNIX (Amazon VPC)
          - region: us-west-1
            virtualizationType: hvm
            instanceType: t2.micro
            sourceAmi: ami-b1a59fd1
            sshUserName: centos
            spotPrice: 0            spotPriceAutoProduct: Linux/UNIX (Amazon VPC)
          - region: us-west-2
            virtualizationType: hvm
            instanceType: t2.micro
            sourceAmi: ami-b63ae0ce
            sshUserName: centos
            spotPrice: 0
            spotPriceAutoProduct: Linux/UNIX (Amazon VPC)
        - baseImage:
            id: ubuntu
            shortDescription: v12.04
            detailedDescription: Ubuntu Precise Pangolin v12.04
            packageType: deb
            templateFile: aws-ebs.json
          virtualizationSettings:
          - region: us-east-1
            virtualizationType: hvm
            instanceType: t2.micro
            sourceAmi: ami-d4aed0bc
            sshUserName: ubuntu
            spotPrice: '0'
            spotPriceAutoProduct: Linux/UNIX (Amazon VPC)
          - region: us-west-1
            virtualizationType: hvm
            instanceType: t2.micro
            sourceAmi: ami-4f285a2f
            sshUserName: ubuntu
            spotPrice: '0'
            spotPriceAutoProduct: Linux/UNIX (Amazon VPC)
          - region: us-west-2
            virtualizationType: hvm
            instanceType: t2.micro
            sourceAmi: ami-59396769
            sshUserName: ubuntu
            spotPrice: '0'
            spotPriceAutoProduct: Linux/UNIX (Amazon VPC)
          - region: us-east-1
            virtualizationType: pv
            instanceType: m3.medium
            sourceAmi: ami-8007b2e8
            sshUserName: ubuntu
            spotPrice: '0'
            spotPriceAutoProduct: Linux/UNIX (Amazon VPC)
          - region: us-west-1
            virtualizationType: pv
            instanceType: m3.medium
            sourceAmi: ami-3a12605a
            sshUserName: ubuntu
            spotPrice: '0'
            spotPriceAutoProduct: Linux/UNIX (Amazon VPC)
        - baseImage:
            id: trusty
            shortDescription: v14.04
            detailedDescription: Ubuntu Trusty Tahr v14.04
            packageType: deb
          virtualizationSettings:
          - region: us-east-1
            virtualizationType: hvm
            instanceType: t2.micro
            sourceAmi: ami-9eaa1cf6
            sshUserName: ubuntu
            spotPrice: '0'
            spotPriceAutoProduct: Linux/UNIX (Amazon VPC)
          - region: us-west-1
            virtualizationType: hvm
            instanceType: t2.micro
            sourceAmi: ami-12512d72
            sshUserName: ubuntu
            spotPrice: '0'
            spotPriceAutoProduct: Linux/UNIX (Amazon VPC)
          - region: us-west-2
            virtualizationType: hvm
            instanceType: t2.micro
            sourceAmi: ami-3d50120d
            sshUserName: ubuntu
            spotPrice: '0'
            spotPriceAutoProduct: Linux/UNIX (Amazon VPC)
          - region: eu-central-1
            virtualizationType: hvm
            instanceType: t2.micro
            sourceAmi: ami-87564feb
            sshUserName: ubuntu
            spotPrice: '0'
            spotPriceAutoProduct: Linux/UNIX (Amazon VPC)
          - region: eu-west-1
            virtualizationType: hvm
            instanceType: t2.micro
            sourceAmi: ami-f95ef58a
            sshUserName: ubuntu
            spotPrice: '0'
            spotPriceAutoProduct: Linux/UNIX (Amazon VPC)
          - region: us-east-1
            virtualizationType: pv
            instanceType: m3.medium
            sourceAmi: ami-98aa1cf0
            sshUserName: ubuntu
            spotPrice: '0'
            spotPriceAutoProduct: Linux/UNIX (Amazon VPC)
          - region: us-west-1
            virtualizationType: pv
            instanceType: m3.medium
            sourceAmi: ami-59502c39
            sshUserName: ubuntu
            spotPrice: '0'
            spotPriceAutoProduct: Linux/UNIX (Amazon VPC)
          - region: us-west-2
            virtualizationType: pv
            instanceType: m3.medium
            sourceAmi: ami-37501207
            sshUserName: ubuntu
            spotPrice: '0'
            spotPriceAutoProduct: Linux/UNIX (Amazon VPC)
        - baseImage:
            id: windows-2012-r2
            shortDescription: 2012 R2
            detailedDescription: Windows Server 2012 R2 Base
            packageType: nupkg
            templateFile: aws-windows-2012-r2.json
          virtualizationSettings:
          - region: us-east-1
            virtualizationType: hvm
            instanceType: t2.micro
            sourceAmi: ami-21414f36
            winRmUserName: Administrator
            spotPrice: '0'
            spotPriceAutoProduct: Windows (Amazon VPC)
        awsAccessKey: <AWS_ACCESS_KEY>
        awsSecretKey: <AWS_SECRET_KEY>
      accessKeyId: <AWS_ACCESS_KEY>
      secretAccessKey: <AWS_SECRET_KEY>
      defaultKeyPairTemplate: '{{name}}-keypair'
      defaultRegions:
      - name: us-east-1
      defaults:
        iamRole: BaseIAMRole
    # halconfig
    server:
      port: ${services.rosco.port:8087}
      address: ${services.rosco.host:localhost}
    redis:
      connection: ${services.redis.baseUrl:redis://localhost:6379}
    rosco:
      configDir: /opt/rosco/config/packer
Note: To know the list of images, you can run one of the commands below
					aws ec2 describe-images \
    --owners aws-marketplace \
    --filters '[
        {"Name": "name",                "Values": ["CentOS Linux 7*"]},
        {"Name": "virtualization-type", "Values": ["hvm"]},
        {"Name": "architecture",        "Values": ["x86_64"]},
        {"Name": "image-type",          "Values": ["machine"]}
    ]' \
    --query 'sort_by(Images, &CreationDate)[-1]' \
    --region us-east-1 \
    --output table
Then, you can run hal deploy apply for the changes to take effect.
c. Now go to your application > pipeline and configure the Bake stage similar to the below
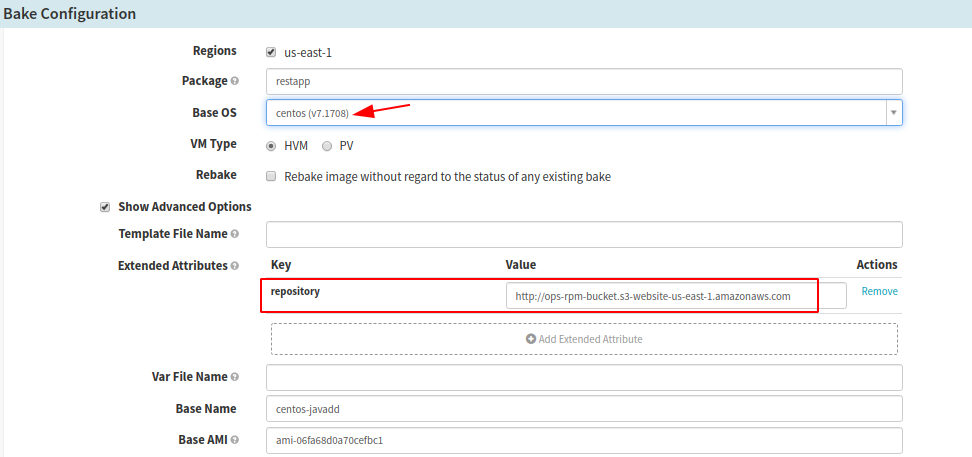
Here, you should be able to change the ‘Base OS’ to CentOS. Optionally, if you want to override Yum repository to be a different one than what is configured in the rosco-local.yml file, then you can set ‘Extended Attribute with a Key name to repository and it’s Value to your yum-repo’
6. Execute the pipeline and verify that your pipeline is run as expected.
0 Comments