In an organization, the number of pipelines will keep increasing as the number of application deployments increase and the Spinnaker pipeline adoption increases. Over a period of time, the Continuous Delivery (CD) pipelines in Spinnaker are most likely to have similar functionality with each other as most of the pipelines are with alike stages or different.
Is there a way to synergize the best practices and standardize the continuous deployment process across teams and/or apps?
The answer is – yes, ‘Managed Pipeline Template’ is your solution.
In this article, we will be covering the procedure to create a Managed Pipeline Template and set up a pipeline deriving from the ‘Pipeline’ template.
Pre-Requisites for making Spinnaker CD pipelines reusable with Managed Pipeline Template
For setting up a successful baking stage in Spinnaker, the requirements are as follows:
- A working Spinnaker instance.
- Working knowledge of the Linux environment.
The Spinnaker CD Pipeline requires the following:
- A pipeline with a matured delivery process
Understanding the Managed Pipeline Template in Spinnaker
Continuous Delivery (CD) Pipelines in Spinnaker are visually represented with stages connected with one after the other in sequential and sometimes in parallel. The pipeline data is preserved in JSON format in the Front50 backend.
The pipeline template is nothing but a regular pipeline minus the pipeline configuration. Behind the scene, it uses Jinja for JSON template construction.
The pipeline template can be thought of, a way to standardize the best practices of pipeline that you have learned so far with Spinnaker. This can be distributed to different teams within the same or different applications or among different spinnaker installations.
You can create a pipeline from the template by providing values to the variables defined in the template. Remember any changes made to the pipeline template even after it has been inherited, are propagated to the inherited pipelines automatically. The pipeline is hydrated by the Orca engine during the pipeline execution.
Installing and Configuring Spinnaker CLI
After amending the template with the variables, Spin CLI is required to update the pipeline template in Spinnaker. Let’s learn how to install and configure the Spin CLI.
Installing Spin CLI
					curl -LO
https://storage.googleapis.com/spinnaker-artifacts/spin/$(curl -s
https://storage.googleapis.com/spinnaker-artifacts/spin/latest)/linu
x/amd64/spin chmod +x spin; sudo mv spin /usr/local/bin/spin
Configuring Spin CLI
					mkdir ~/spin
# Inside the dir, setup ‘config’ file using the sample
# https://github.com/spinnaker/spin/blob/master/config/example.yaml
#Sample ~/.spin/config
gate:
   endpoint: http://demospin.net:9000/gateauth:
    enabled: false
Enabling Pipeline Template Feature in your Spinnaker
In Spinnaker version 1.19.0 or higher, the Pipeline template feature is enabled by default, you don’t need to enable it. Simply start using it if required.
However, in any Spinnaker version prior to 1.19.0, this pipeline template feature has to be enabled explicitly. To enable the feature, execute the following commands in Halyard:
					# Enable Pipeline template in Spinnaker versions prior to 1.19.0
hal config features edit --pipeline-templates true
hal config features edit --managed-pipeline-templates-v2-ui true
Creating a new Pipeline Template in Spinnaker
Once the pipeline feature is enabled, you can create a pipeline template from a working Pipeline. The available templates are visible under the Templates section. You can copy the template JSON to a file on your machine, update it with variables.
To create a pipeline template from a pipeline, edit the pipeline > Click on ‘Pipeline Actions’ and select ‘Export as Pipeline Template’ from the drop-down menu.
Now a pipeline template is created. To make modifications to the template, copy the JSON content to a file on your system, update the template with your variables. The pipeline template format looks like as shown below:
					{
  "schema": "v2",
  "variables": [
    {
      "type": "<type>",
      "defaultValue": <value>,
      "description": "<description>",
      "name": "<varName>"
    }
  ],
  "id": "<templateName>",          # The pipeline instance references the template using this
  "protect": <true | false>,
  "metadata": {
    "name": "displayName",          # The display name shown in Deck
    "description": "<description>",
    "owner": "example@example.com",
    "scopes": ["global"]            # Not used
  },
    "pipeline": {                     # Contains the templatized pipeline itself
    "lastModifiedBy": "anonymous",  # Not used
    "updateTs": "0",                # Not used
    "parameterConfig": [],          # Same as in a regular pipeline
    "limitConcurrent": true,        # Same as in a regular pipeline
    "keepWaitingPipelines": false,  # Same as in a regular pipeline
    "description": "",              # Same as in a regular pipeline
    "triggers": [],                 # Same as in a regular pipeline
    "notifications": [],            # Same as in a regular pipeline
    "stages": [                     # Contains the templated stages
      {
        # This one is an example stage:
        "waitTime": "${ templateVariables.waitTime }",  # Templated field.
        "name": "My Wait Stage",
        "type": "wait",
        "refId": "wait1",
        "requisiteStageRefIds": []
      }
    ]
  }
}
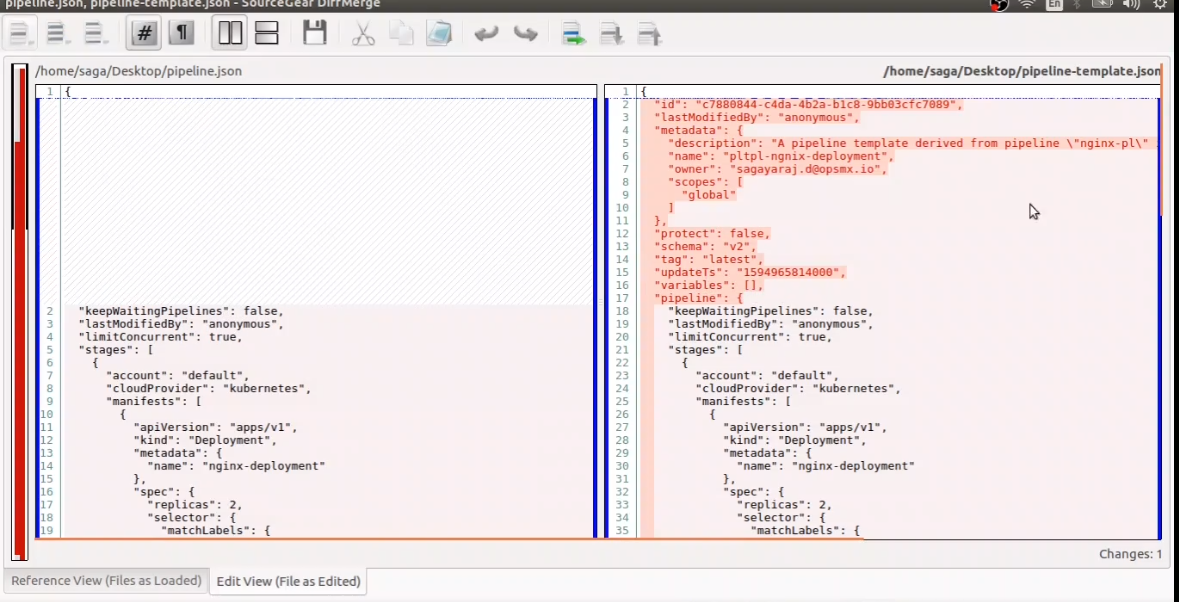
Compare the pipeline JSON and template JSON. Note the difference is that the template has additional elements like schema, variables, and pipeline.

Comparison between the pipeline JSON and template JSON in Spinnaker
Once you are ready to update the template back into the Spinnaker template, run the following command:
$ spin pipeline-template save --file pipeline_withVars.json
The above command will update the existing template with the changes you made, like variables.
Creating a CD Pipeline from a Spinnaker Pipeline Template
Now that you have a pipeline template, you can create new pipelines from it. Go to the Templates tab, and create a new pipeline from it as shown below:

Creating a Spinnaker CD Pipeline from a Pipeline Template
On the next screen, choose the application the pipeline belongs to. Then, provide a name to the new pipeline.
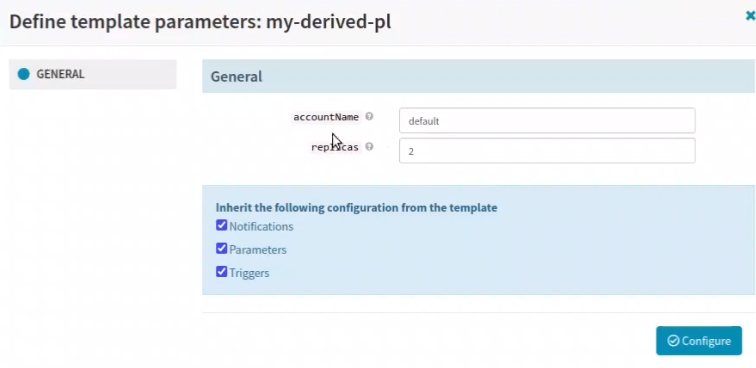
Provide parameter values to the variables defined in the pipeline template.

Providing parameter values in the Pipeline Template
Finally, save the pipeline. The pipeline icon is different between the regular pipeline and the pipeline from the template; the template derived pipeline is with a grid icon.
Execute the template-derived pipeline in the same way as the regular pipeline – no difference.
Summary
We have explained the procedure of setting up a CD pipeline template and creating a CD pipeline from the template. Install Spinnaker, deploy your apps by creating a CD pipeline in Spinnaker today!
If you want to know more about the Spinnaker or request a demonstration, please book a meeting with us.
About OpsMx
Founded with the vision of “delivering software without human intervention,” OpsMx enables customers to transform and automate their software delivery processes. OpsMx builds on open-source Spinnaker and Argo with services and software that helps DevOps teams SHIP BETTER SOFTWARE FASTER.


0 Comments